Sunday 26 August 2012

laab gai

Fresh back from a recent family break in Phuket, Thailand ... a popular holiday destination for Hong Kongers with it being just a hop, skip and jump away . . I felt inspired to develop a Thai favourite of ours for the Thermomix. I just love Thailand. I have travelled through most of the country on various trips over the years. I love, it's natural beauty as well as the hustle and bustle of it's capital (and the shopping of course), it's people and culture .... but most of all it's food :)

So far I have discovered that the thermie is very well suited to make our favourite Thai curries and to blend Thai-style dressings for salads, but this has been the extent of my Thai cooking using the thermomix so far.  Indeed I plan to do a lot more!

I picked up some dried galangal (pronounced 'kah' in Thai) and dried chillies while in Phuket to make this dish. 
This dish calls for charring them in a pan, then grinding them into a powder, which really adds to this recipe's authenticity and depth of flavour . . . yum!

Laab Gai


ingredients
2 tbsp white rice
2 sml pieces dried galangal
a handful of dried Thai chillies (or chilli powder)
600g chicken breast or thigh fillet, skinless, chopped roughly
20g coconut oil
6 cloves garlic
1 stalk lemon grass, cut into 2cm lengths
1 shallot
2 spring onions, cut into 2cm lengths 
a good handful fresh mint leaves
3-4 tbsp fish sauce
juice 2-3 limes
1/2 -1 tsp raw caster sugar, to balance flavours

method
1. Dry roast the white rice at varoma temp on speed 1 for 12-15 minutes, or until the rice has a golden tinge to it. Remove TM bowl from it's base and allow to cool. Any white rice will do. I used basmati . . . for authenticity use Thai glutinous rice.  

2. While the rice is cooling, add the dried galangal pieces to a small pan (preferably cast iron) or a wok on medium heat until the pieces are darkened and slightly charred. Allow to cool, then add to the TM bowl with the roasted rice and grind into a fine powder on speed 9 for about 30 seconds. Decant and set aside.
Dried galangal & Thai chillies
3. Now roast a handful of Thai dried chillies in the same pan, turning frequently until they are darkened and slightly charred. Allow to cool, then add to the TM bowl and grind into a fine powder on speed 9 for about 30 seconds

4. Add the chicken to the TM bowl and pulse with the turbo button 3-4 times into mince. Add coconut oil and cook for 5-6 minutes at 100°C on reverse + speed soft, or until all of the chicken mince is cooked through. Remove the cooked chicken and set aside. 

5. Add the garlic cloves, lemon grass, shallot, spring onions and mint to the TM bowl and chop on speed 6 for 5 seconds, or until finely chopped. 

6. Return to chicken to the TM bowl and add the fish sauce, lime juice, ground roasted rice and galangal, plus 1/2 - 2 tsp of the ground dried Thai chilli powder (or to taste). Combine on reverse, speed 3 for 10 seconds

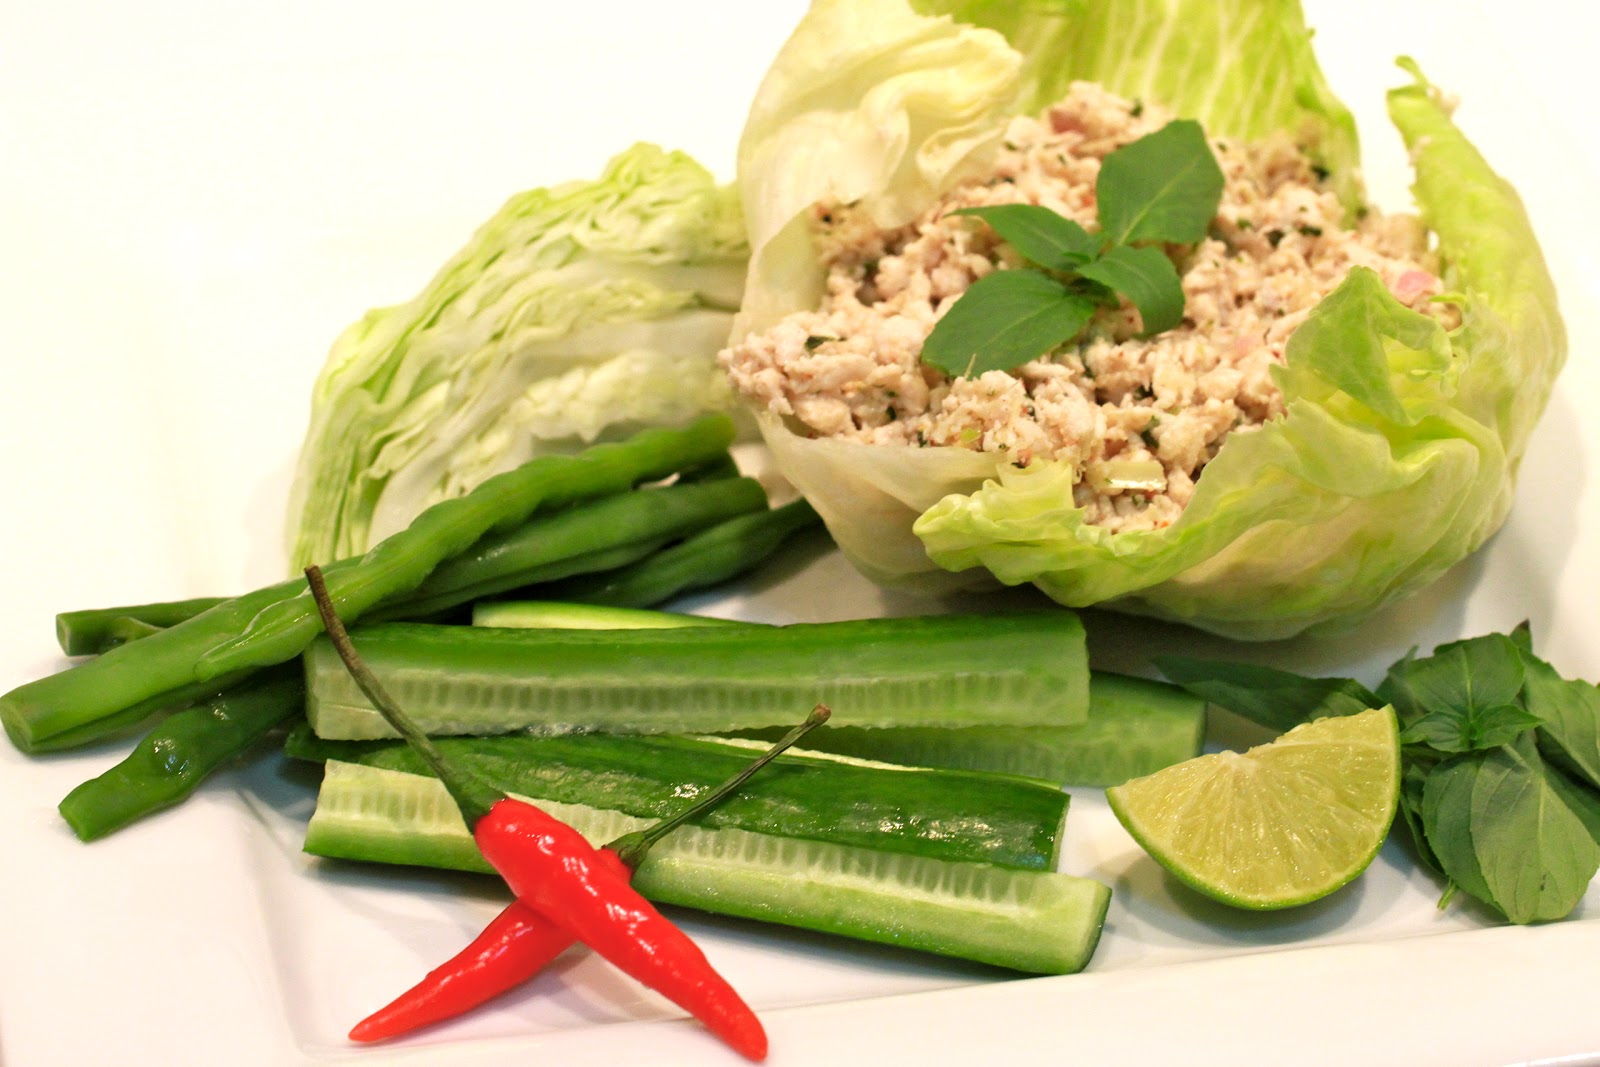
7. Taste and adjust flavours to desired sourness, hotness and saltiness. Add sugar only as needed to pull the flavours together. Serve at room temperature in a lettuce leaf cup on a plate with assorted vegetables such as lightly steamed green beans, cucumber sticks, a wedge of cabbage and fresh herbs such as Thai basil and mint.

no thermomix?
  • Roast the white rice in a hot dry pan (cast iron is best) or wok over low-medium heat until golden brown for about 12 minutes. Stirring constantly so that it doesn't burn.
  • Grind the rice, galangal and dried chilli using a coffee grinder. 
  • Use chicken mince and cook on the stovetop.

recipe adapted for the Thermomix from Temple of Thai


Find me on Facebook at Mixing it up in HK


Sunday 19 August 2012

Healthy citrus & poppyseed muffins

As requested by Miss 8, mummy's homemade version of her coffee shop favourite . . and do they stack up?? Miss 8 says "These are way better mummy . . plus they are healthy!" . . . Ha! Nothing escapes my daughter! 

These yummy wholesome muffins are citrus-y, moist and light and come with considerably less guilt than your average citrus poppyseed muffin . . .being lower in fat and sugar, and higher in dietary fibre.

Apple, orange & lemon poppyseed muffins


As this recipe uses the whole fruit, skin and all . . . I'd recommend you try to use an organic apple, orange and lemon for this recipe if possible, or at least wash the fruit thoroughly with a fruit and vegetable wash. Virtually nothing goes to waste in this recipe! These will be great for the school lunch box. . .

ingredients

1 whole apple (I used Pink Lady)
1 whole medium orange or tangelo
zest of 1 lemon (plus juice for icing)
2 large eggs
30g coconut oil, melted if solid (or use melted butter)
50g natural yoghurt
2 tsp baking powder
1 tsp bicarb
120g white spelt flour
120g wholemeal spelt flour
100g sucanat (rapadura) sugar or raw sugar
1-2 tbsp poppyseeds

method
  1. Preheat oven to 170°C and prepare a 12-hole muffin pan.
  2. Peel the zest from the lemon and add to the TM bowl and grind for 30 seconds on speed 9, decant and set aside.
  3. Core and quarter one apple. Add to the TM bowl and chop for 10 seconds on speed 4Scrape down the sides.
  4. Add 20g water and cook for 8 minutes at 100°C on speed 1. MC lid off.  
  5. Cut a whole orange into quarters. Remove the stem piece and slice down the centre of each wedge to remove the white pith and any obvious pips. Add to the TM bowl and blend on speed 7 for 10 seconds
  6. Return the lemon zest to the TM bowl. Add the eggs, coconut oil and natural yoghurt. Mix on speed 8 for 10 seconds until well combined. 
  7. Add baking powder, bicarb, flours, sucanat and poppyseeds and mix for about 8 seconds on reverse speed 4 until mixture just comes together. Do not over-mix.
  8. Spoon the muffin mixture into prepared muffin holes filling each to the top, and place in preheated oven to bake for about 12-15 minutes or until golden and a skewer comes out clean. Makes 12. 
  9. Juice the zested lemon and make a lemon icing to drizzle over the muffins as pictured (100g icing sugar + 1-2 tbsp lemon juice), or enjoy without to avoid the extra sugar. My girls had fun icing them :-)
 

no thermomix?
  • grate lemon zest using a grater, cook up chopped apple on a stovetop or in the microwave. Use a blender or food processor to blend the orange before combining with the remaining ingredients.

 Find me on Facebook at Mixing it up in HK

Quick choc-mint fix treat balls

My girls requested these non-stop over our recent trip home to Australia in the July 2012 school holidays. They are a variation of my original treat ballsGreat if you don't have raw cacao beans or nibs on hand. Stick to the basic recipe or mix up to your preference. If you don't have the seeds just add more nuts. 

ingredients
20g flaxseeds (linseeds) or chia
80g raw walnuts (or a mix of your fave nuts)
100g fresh dates, pitted
100g mixed dried fruit (e.g. blueberries, sultanas, prunes, cherries, goji or more dates)
4 tbsp raw cacao
5 drops 100% pure peppermint essential oil 
1 tsp vanilla bean paste (optional)
pinch salt


method

1. Add seeds and nuts to the TM bowl and grind into a fine powder on speed 9 for about 20-30 seconds.

2. Add all remaining ingredients and mix on speed 8 for about 30 seconds until the mixture comes together well and is able to be shaped into balls. If the mixture is a little dry which will depend on the ingredient combination you use, simply mix a little longer to release more oils from the nuts and seeds, or you may need to add a little coconut oil.

3. Shape into approximately 15 balls. Roll in desiccated coconut or enjoy as is. Store in the refrigerator for up to a week, if they last that long! 

For more healthy treat ball recipes click here

UPDATE (March 2013): For an adults only version, grind a couple of coffee beans with the nuts & seeds for a coffee flavour. I discovered this flavour sensation after grinding some coffee beans first and leaving remnants of the powder in the TM bowl before making this recipe without peppermint oil (+ vanilla) . .  you could always add a little liquor as a flavouring option too :)

Find me on Facebook at Mixing it up in HK

Saturday 18 August 2012

Chunky roasted red capsicum, semi-dried tomato, artichoke & cashew dip

This is an adaptation of the EDC Capsicum & sundried tomato dip recipe. I am a big fan of chunky, pesto-style dips and this one hits the spot. Thought I'd share . . . 


ingredients

1 red capsicum, chargrilled, peeled and cut into chunks
1 large clove garlic
100g semi-dried tomatoes, drained
50g marinated artichoke hearts, drained
160g raw cashews (or roasted if you prefer)
20-30g extra virgin olive oil
juice of half a lemon
handful of fresh basil leaves
2 rounded tbsp parmesan cheese (grated first in TM)

method

1. To chargrill red capsicum: Hold the capsicum with the stem upright and remove the core as you slice downwards to create 4 large pieces (or cheeks). Remove any membranes or seeds. Place each of capsicum pieces on a sheet of foil on an oven tray under a hot grill for about 10 minutes or until blackened and blistered. Remove from grill, fold up the sides of the foil and wrap ensuring that the steam cannot escape. Allow to cool, over which time the steam will condense and allow for the skin to be easily removed. Peel of the skin and cut into chunks.

2. Place all ingredients in the TM bowl, including the prepared roasted red capsicum (above), and set dial to closed lid position. Use the turbo button to pulse 4 quick times, so that you have a chunky but evenly chopped mixture. Enjoy with TM made crackers and/or vegetable sticks. 

This recipe makes two small bowls. You can store the leftovers in an airtight container or glass jar in the fridge for a few days. Drizzle with a little olive oil. 

no thermomix?
use a food processor or chop and mix by hand :)

TIP: Blend a little of this dip into a yummy salad dressing with little extra EVOO and lemon juice or white wine vinegar. 


Find me on Facebook at Mixing it up in HK


Thursday 16 August 2012

Green superfood balls

I am very excited to hear that we have a new organic health food shop opening in Discovery Bay very soon called Just Green. I just happened to be google-ing organic produce in Hong Kong when I came across this information . . . this may not be news for some DBers, but I have been out of town for most of the Summer :)  I was in the city recently, and popped into their Wan Chai store to check it out. What a gold mine of organic goodies! I was very pleased to find just about everything on the shelves that I have been sourcing in Australia to make my recipes. Plus they sell dehydrators . . ooh how I'd love one of those one day!

So, I walked out of the shop with quite a few goodies under my arm, including some organic dried spirulina, (I take spirulina in tablet form, but I have never used this superfood in cooking). I say 'cooking' but of course you should always use spirulina raw to preserve its nutritional status. I was thinking about grinding up a scoop of it to add to fresh blended juice smoothies for my girls, but I couldn't resist trying it out in a green superfood treat ball :) Here goes . . . .

Green superfood balls
Each ball provides 1g of spirulina (1-5g per day has been associated with significant health benefits and many people take up to 10g daily). I couldn't resist adding raw cacao (also a superfood), which does tone down the green colour of the ball and adds a mild chocolate flavour. Of course, this is only an obligatory addition in my household :) 

Enjoy 2 balls per day for a wonderful energising, appetite-suppressing, nutrient fix! 
Try to buy certified organic ingredients where possible. 


ingredients
30g raw pistachios (shelled), for coating
30g desiccated coconut, for coating 
20g dried spirulina pieces (or powder)
20g organic chia seeds
100g fresh coconut 
75g almonds + 75g walnuts (preferably activated)
150g fresh medjool dates
50g organic dried goji berries 
1-2 tsp vanilla bean paste 
20g organic raw cacao powder (optional)

method
1. Add raw pistachios to the TM bowl and pulse on Turbo 2-3 times. Add desiccated coconut and combine for a few seconds on reverse, speed 3. Set aside in a shallow bowl for coating the balls later.

2. Add spirulina pieces and chia seeds to the TM bowl and grind on speed 9 for 20 seconds. Set aside in separate bowl to the coating ingredients (above).

3. Grate fresh coconut on speed 9 for 10 seconds, set aside with ground spirulina and chia.

4. Add almonds, walnuts and goji berries to the TM bowl and grind on speed 7 for 20 seconds. If you'd like some chunky pieces of nuts in your balls, pulse a portion rather than grind them all.

5. Return the coconut, chia and spirulina to the TM bowl together with the fresh dates, vanilla and raw cacao (optional). Mix on speed 8 for 30 seconds or until the mixture comes together well and is able to be squished and rolled into balls.

6. Roll mixture into small balls. I find it easy to scoop a plastic tbsp up the side of the TM bowl then finish rounding the ball by hand. Coat your superfood balls in a mixture of finely chopped pistachios and desiccated coconut. Makes about 20 balls. Store in the fridge for up to 4 days. 


nutrition tid bits
'Superfood' seems to be the latest buzz word in nutrition these days, and is used to identify any nutrient-rich food considered to be especially beneficial for health and well-being. All of the ingredients in this recipe make this renowned list.

Spirulina, is an edible blue-green algae which could in fact be the most nutritious food known. Widely referred to as a 'powerhouse of nutrition', well over 400 scientific studies have proven it's worth. Spirulina is about 60% complete protein, a good source of the healthy omega fats, the highest known source of B12 and betacarotene (precursor to vitamin A), plus it comprises a huge variety of other vital vitamins, minerals and phytonutrients, (NaturalNews). I like to buy spirulina as pure sun-dried pieces and grind it into a powder myself, using my Thermomix of course! Spirulina should be kept in an airtight glass jar in the fridge. You can crunch on this green superfood as a snack, add it to salads or in powder form, add it to freshly prepared blended juices or smoothies (as mentioned above), but if all that sounds a little too adventurous, it does go well in these balls I promise :) 

nutrition per ball
protein 3.2g
carbs 4.4g
total fat 8g
saturated fat 2.2g
dietary fibre 1g
kilojoules 403
calories 96

Extra coconut meat from your freshly opened mature coconut, can be used in your CADA breakfast. It will keep for up to 4 days (grated or in pieces) in an airtight container in the fridge. You can also freeze fresh coconut for up to 6 months. 

For more raw treat ball recipes click here.
Find out why and how I use chia in my recipes here.


Find me on Facebook at Mixing it up in HK


Saturday 4 August 2012

Mexican sausages

This is a recipe that I have been making for years, even before children, because it was a favourite of my hubby's . . definitely long before my Thermie came onto the scene. But of course, like everything else, if a recipe is to remain in my repertoire these days, it must be converted for the Thermomix! This recipe was originally passed on to me by my mother-in-law, but has seen quite a few tweaks since then. Check the 'variation ideas' below for even more tweaks you can make :)

Although sausages are not something I like my family to eat too often, this is a really quick, simple and yummy way to serve them up . . . and my girls devour this meal. It's also a little more nutritious than just a sausage in a bun :) Just make sure you use good quality real sausages. We like to use beef but you could use chicken or pork. 

Mexican Sausages


ingredients
6-8 thin good quality beef sausages
1 onion, halved
1 clove garlic
1 x 425g can organic chopped tomato
200g organic tomato passata 
120g filtered water
1 tbsp TM vegetable or chicken stock paste
1 x can organic chickpeas (garbanzo beans), drained & rinsed
a dollop of sweet chilli sauce (or chilli powder, to taste)
½ tsp ground cumin
80g organic baby spinach, roughly chopped
fresh chopped parsley, optional

to serve(optional)
150g white basmati rice (more if you prefer)
400g filtered water

method
  1. Cook sausages in a frypan on high heat or on the BBQ until browned and cooked through. Remove and drain on absorbent paper. You can easily cook the sausages ahead of time and keep in the fridge until needed. If you do this, you may need to add a little extra time for re-heating them in the sauce at step 6.
  2. Place onion and garlic clove in TM bowl and chop 5 seconds on speed 7. Scrape down sides.
  3. Add a dash of olive oil and sauté for 3 minutes at 100°C on speed 1.
  4. Add can tomatoes and sauce (passata), water, 1 tbsp vege stock concentrate, chickpeas, sweet chilli sauce and cumin.
  5. Cook for 15 minutes at 100°C reverse + speed soft.
  6. Slice sausages 1-2 cm to your preference, add to the TM bowl and continue to cook on 100°C reverse, speed soft for an extra 3 minutes. You can add the spinach leaves at this stage too or if you are serving up in a large server,  place the spinach leaves at the bottom of your dish and pour the Mexican sausages over the top. 
variation ideas
  • Add ½ tsp sweet paprika + ½ tsp cinnamon
  • Add chunks red & yellow capsicum (peppers) at step 5 or steam in the varoma over the top of the sauce and stir through in the final step.
  • We like to cook the sausages on the BBQ or on the stovetop, but you could steam the sausages in the Varoma as you cook the sauce then slice up and add at step 6.
  • Serve with steamed basmati rice, which you can cook first and keep warm in a thermosaver. Chickpeas are a good source of carbohydrates so I don't serve up rice with this meal. 
no thermomix?
Cook sausages on the BBQ or in a frypan and prepare the meal in a deep non-stick pan on the stovetop. Use a stock cube in place of the TM stock paste.


nutrition tid bid
Chickpeas or garbanzo beans as they are also called, are a fabulous source of insoluble dietary fibre which supports the growth of healthy bacteria in your large intestine. They are also a very good source of protein and relatively low in kilojoules. Studies have shown that regular consumption of chickpeas has a favourable influence on blood sugar and insulin levels as well as triglycerides and cholesterol. They are also a potent source of antioxidant phytonutrients and manganese, aswell as a very good source of copper, phosphorous and iron. The home cooked variety are rich in B vitamins and folate which are mostly destroyed by high temperatures during the canning process. Recent studies have shown a positive relationship between chickpeas and weight management due to their beneficial effect on food satiety (www.whfoods.com)which essentially means that they fill you up for longer. All in all many good reasons to eat these scrummy nut-like, buttery beans regularly :)


Always look for BPA and additive free cans of tomatoes and chickpeas or cook them up yourself. Just be sure to pre-soak the chickpeas for at least 4 hours before cooking to reduce phytic acid levels which have an unfavourable effect on digestion and absorption of nutrients. If you are making chickpea flour from dried chickpeas, it is a good idea to soak and dehydrate the beans first for this same reason. 


Find me on Facebook at Mixing it up in HK